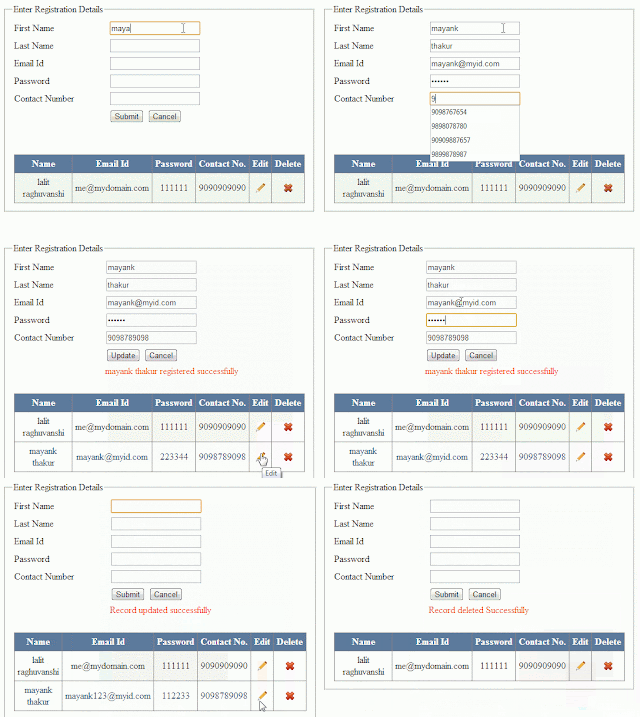
So basically this article will demonstrate with example the following:
- Step by step procedure/example to create wcf service
- How to consume/access wcf service
- How to bind/Load/Fill gridview from Sql server database using wcf service
- How to perform insert, edit, update and delete operation on gridview using wcf service
 |
| Click on image to enlarge |
Description: In some of my previous articles i clearly demonstrated with examples How to Bind,Save,Edit,Update,Cancel,Delete,Paging example in GridView in asp.net and How to create crystal reports in visual studio 2010 using asp.net and How to Convert Rupees,Currency or Numbers to Words in Asp.net C# and How to Get age in years,months,days,hours and seconds from DOB in asp.net C#,Vb.Net.
Here in this article first i will create the wcf service having bind, save, edit, update and delete methods then i will create the consuming application that will consume these methods.
Implementation: So let's start an application to understand.
- Open Visual Studio -> Go to File menu -> New -> Project -> Select WCF Service Application and give it name "WcfServiceDemo" as shown in image below.
 |
| Click on image to enlarge |
- Two files IService1.cs and Service1.svc will be added under the project in the solution explorer. Service1.svc.cs file will be opened by default.
- Before moving further we need to create the database and table from where data is to be retrieved and saved.
 |
| Click on image to enlarge |
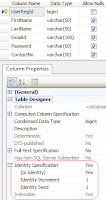
- So create the database in sql server and name it "MyDataBase" or whatever you want. In this database create a table as shown in image on the right side and name it "UserReg". Note: UserRegId column is set to Primary key and Identity specification is set to yes with Identity increment and Identity seed equal to 1.
- In the web.config file create the connection string as:
<connectionStrings>
<add name="ConStr" connectionString="Data Source=LocalServer;Initial Catalog=MyDataBase;Integrated Security=True"/>
</connectionStrings>
- Now open the Iservices1.cs file and remove all the default code and declare the Service Contracts, Operation Contracts and Data Contracts:
First include the following namespaces:
using System.Data;
using System.Data.SqlClient;
namespace WcfServiceDemo
{
[ServiceContract]
public interface IService1
{
[OperationContract]
string InsertUserRegDetails(RegDetails regdet);
[OperationContract]
DataSet GetUserRegDetails();
[OperationContract]
DataSet FetchUpdatedRecords(RegDetails regdet);
[OperationContract]
string UpdateUserRegDetails(RegDetails regdet);
[OperationContract]
bool DeleteUserRegDetails(RegDetails regdet);
}
// Use a data contract as illustrated in the sample below to add composite types to service operations.
[DataContract]
public class RegDetails
{
int p_UserRegId;
string p_FirstName = string.Empty;
string p_LastName = string.Empty;
string p_EmailId = string.Empty;
string p_pwd = string.Empty;
string p_contact = string.Empty;
[DataMember]
public int UserRegId
{
get { return p_UserRegId; }
set { p_UserRegId = value; }
}
[DataMember]
public string FirstName
{
get { return p_FirstName; }
set { p_FirstName = value; }
}
[DataMember]
public string LastName
{
get { return p_LastName; }
set { p_LastName = value; }
}
[DataMember]
public string EmailId
{
get { return p_EmailId; }
set { p_EmailId = value; }
}
[DataMember]
public string Password
{
get { return p_pwd; }
set { p_pwd = value; }
}
[DataMember]
public string ContactNo
{
get { return p_contact; }
set { p_contact = value; }
}
}
}
- Now open the Service.svc.cs file and remove the default code and define the methods declared in the IService1.cs above.
First include the following namespaces:
using System.Data;
using System.Data.SqlClient;
using System.Configuration;
namespace WcfServiceDemo
{
public class Service1 : IService1
{
SqlConnection con = new SqlConnection(ConfigurationManager.ConnectionStrings["ConStr"].ConnectionString);
public string InsertUserRegDetails(RegDetails regdet)
{
string Status;
if (con.State == ConnectionState.Closed)
{
con.Open();
}
SqlCommand cmd = new SqlCommand("insert into UserReg(FirstName,LastName,EmailId,Password,ContactNo) values(@FirstName,@LastName,@EmailId,@Password,@ContactNo)", con);
cmd.Parameters.AddWithValue("@FirstName", regdet.FirstName);
cmd.Parameters.AddWithValue("@LastName", regdet.LastName);
cmd.Parameters.AddWithValue("@EmailId", regdet.EmailId);
cmd.Parameters.AddWithValue("@Password", regdet.Password);
cmd.Parameters.AddWithValue("@ContactNo", regdet.ContactNo);
int result = cmd.ExecuteNonQuery();
if (result == 1)
{
Status = regdet.FirstName + " " + regdet.LastName + " registered successfully";
}
else
{
Status = regdet.FirstName + " " + regdet.LastName + " could not be registered";
}
con.Close();
return Status;
}
public DataSet GetUserRegDetails()
{
if (con.State == ConnectionState.Closed)
{
con.Open();
}
SqlCommand cmd = new SqlCommand("Select * from UserReg", con);
SqlDataAdapter da = new SqlDataAdapter(cmd);
DataSet ds = new DataSet();
da.Fill(ds);
cmd.ExecuteNonQuery();
con.Close();
return ds;
}
public DataSet FetchUpdatedRecords(RegDetails regdet)
{
if (con.State == ConnectionState.Closed)
{
con.Open();
}
SqlCommand cmd = new SqlCommand("select * from UserReg where UserRegId=@UserRegId", con);
cmd.Parameters.AddWithValue("@UserRegId", regdet.UserRegId);
SqlDataAdapter da = new SqlDataAdapter(cmd);
DataSet ds = new DataSet();
da.Fill(ds);
cmd.ExecuteNonQuery();
con.Close();
return ds;
}
public string UpdateUserRegDetails(RegDetails regdet)
{
string Status;
if (con.State == ConnectionState.Closed)
{
con.Open();
}
SqlCommand cmd = new SqlCommand("update UserReg set FirstName=@FirstName,LastName=@LastName,EmailId=@EmailId, Password=@Password,ContactNo=@ContactNo where UserRegId=@UserRegId", con);
cmd.Parameters.AddWithValue("@UserRegId", regdet.UserRegId);
cmd.Parameters.AddWithValue("@FirstName", regdet.FirstName);
cmd.Parameters.AddWithValue("@LastName", regdet.LastName);
cmd.Parameters.AddWithValue("@EmailId", regdet.EmailId);
cmd.Parameters.AddWithValue("@Password", regdet.Password);
cmd.Parameters.AddWithValue("@ContactNo", regdet.ContactNo);
int result = cmd.ExecuteNonQuery();
if (result == 1)
{
Status = "Record updated successfully";
}
else
{
Status = "Record could not be updated";
}
con.Close();
return Status;
}
public bool DeleteUserRegDetails(RegDetails regdet)
{
if (con.State == ConnectionState.Closed)
{
con.Open();
}
SqlCommand cmd = new SqlCommand("delete from UserReg where UserRegId=@UserRegId", con);
cmd.Parameters.AddWithValue("@UserRegId", regdet.UserRegId);
cmd.ExecuteNonQuery();
con.Close();
return true;
}
}
}
- Now in the solutions explorer Right click on Service1.svc and click on "View in Browser" option as shown in image below:
 |
| Click on image to enlarge |
- It will appear as shown in image below:
 |
| Click on image to enlarge |
Note: Keep it running to test because our wcf service is not running online.
How to create consuming application
- Now let’s create a Consuming application that will consume/access the methods from the wcf service to retrieve and insert data into database.
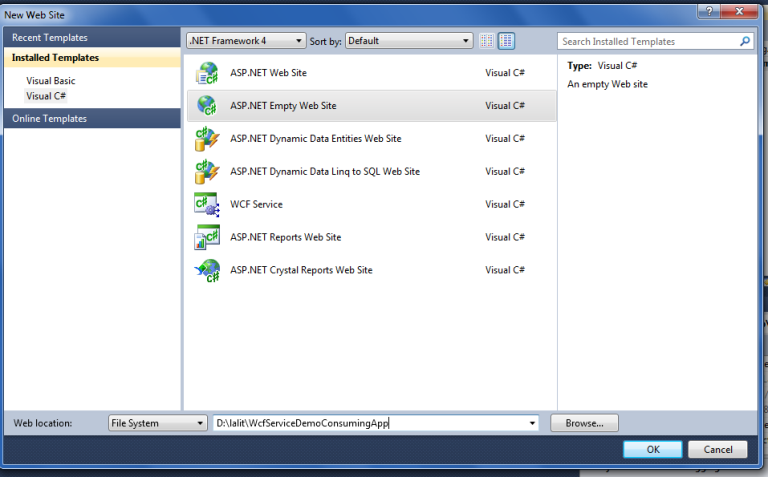
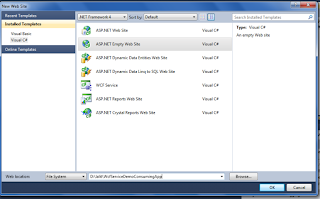
- Open visual studio ->go to File menu-> New ->Select Website and name it "WcfServiceDemoConsumingApp" as shown in image below:
 |
| Click on image to enlarge |
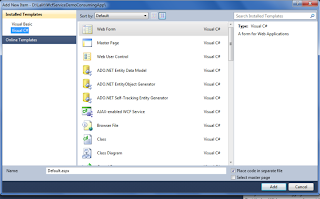
- Now Go to Website menu -> Add new Item -> Web form as shown in image below:
 |
| Click on image to enlarge |
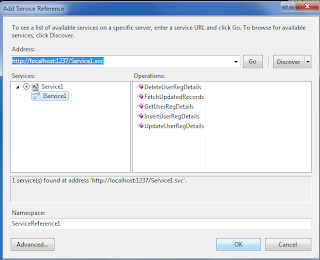
- Now to consume the methods of the wcf service we need to add the service reference. So In solution explorer right click on project -> Add Service Reference as shown in image below.
 |
| Click on the image to enlarge |
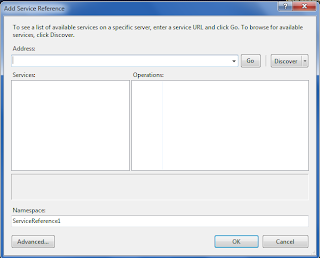
- A new window will appear as shown in image below:
 |
| Click on image to enlarge |
 |
| Click on image to enlarge |
- Click on GO. Expand the Services and click on Iservice1. It will list all the functions/methods created in Services. ServiceReference1 is the name of the namespace. You can also change it but I have kept it default. Click on Ok button. Reference has been added to the solution explorer.
- Now it's time to design the page. In the <Form> tag of design page(default.aspx) design the web page as:
<div>
<fieldset style="width:500px">
<legend>Enter Registration Details </legend>
<table >
<tr>
<td>
First Name</td>
<td>
<asp:TextBox ID="txtFirstName" runat="server" style="margin-right: 59px"></asp:TextBox>
</td>
</tr>
<tr>
<td>
Last Name</td>
<td>
<asp:TextBox ID="txtLastName" runat="server"></asp:TextBox>
</td>
</tr>
<tr>
<td>
Email Id</td>
<td>
<asp:TextBox ID="txtEmail" runat="server"></asp:TextBox>
</td>
</tr>
<tr>
<td>
Password</td>
<td>
<asp:TextBox ID="txtPwd" runat="server" TextMode="Password"
onprerender="txtPwd_PreRender"></asp:TextBox>
</td>
</tr>
<tr>
<td>
Contact Number</td>
<td>
<asp:TextBox ID="txtContact" runat="server"></asp:TextBox>
</td>
</tr>
<tr>
<td>
</td>
<td class="style1">
<asp:Button ID="btnSubmit" runat="server" Text="Submit"
onclick="btnSubmit_Click" />
<asp:Button ID="btnCancel" runat="server" Text="Cancel"
onclick="btnCancel_Click" />
</td>
</tr>
<tr>
<td>
</td>
<td>
<asp:Label ID="lblStatus" runat="server" Text="" style="color: #FF3300"></asp:Label>
</td>
</tr>
<tr>
<td>
</td>
<td>
</td>
</tr>
<tr>
<td colspan="2">
<asp:GridView ID="grdWcfTest" runat="server" AutoGenerateColumns="False"
DataKeyNames="UserRegId" CellPadding="5" ForeColor="#333333">
<AlternatingRowStyle BackColor="White" ForeColor="#284775" />
<Columns>
<asp:TemplateField HeaderText="Name" ItemStyle-HorizontalAlign="Center" HeaderStyle-HorizontalAlign="Center">
<ItemTemplate>
<asp:Label ID="lblName" runat="server" Text='<%#Eval("FirstName") + " " + Eval("LastName") %>'></asp:Label>
</ItemTemplate>
</asp:TemplateField>
<asp:TemplateField HeaderText="Email Id" ItemStyle-HorizontalAlign="Center" HeaderStyle-HorizontalAlign="Center">
<ItemTemplate>
<asp:Label ID="lblEmail" runat="server" Text='<%#Eval("EmailId") %>'></asp:Label>
</ItemTemplate>
</asp:TemplateField>
<asp:TemplateField HeaderText="Password" ItemStyle-HorizontalAlign="Center" HeaderStyle-HorizontalAlign="Center">
<ItemTemplate>
<asp:Label ID="lblPwd" runat="server" Text='<%#Eval("Password") %>'></asp:Label>
</ItemTemplate>
</asp:TemplateField>
<asp:TemplateField HeaderText="Contact No." ItemStyle-HorizontalAlign="Center" HeaderStyle-HorizontalAlign="Center">
<ItemTemplate>
<asp:Label ID="lblContact" runat="server" Text='<%#Eval("ContactNo") %>'></asp:Label>
</ItemTemplate>
</asp:TemplateField>
<asp:TemplateField HeaderText="Edit" ItemStyle-HorizontalAlign="Center" HeaderStyle-HorizontalAlign="Center">
<ItemTemplate>
<asp:ImageButton ID="imgBtn" runat="server" CausesValidation="false" CommandArgument='<%#Eval("UserRegId") %>'
OnCommand="imgEdit_Command" ImageUrl="~/Images/edit.png"
ToolTip="Edit" />
</ItemTemplate>
<HeaderStyle HorizontalAlign="Center"></HeaderStyle>
<ItemStyle HorizontalAlign="Center"></ItemStyle>
</asp:TemplateField>
<asp:TemplateField HeaderText="Delete" ItemStyle-HorizontalAlign="Center" HeaderStyle-HorizontalAlign="Center">
<ItemTemplate>
<asp:ImageButton ID="imgDel" runat="server" CausesValidation="false" CommandArgument='<%#Eval("UserRegId") %>'
CommandName="Delete" OnCommand="imgDel_Command" ImageUrl="~/Images/delete.png"
ToolTip="Delete" OnClientClick="return confirm('Are you sure you want to delete?')" />
</ItemTemplate>
<HeaderStyle HorizontalAlign="Center"></HeaderStyle>
<ItemStyle HorizontalAlign="Center"></ItemStyle>
</asp:TemplateField>
</Columns>
<EditRowStyle BackColor="#999999" />
<FooterStyle BackColor="#5D7B9D" Font-Bold="True" ForeColor="White" />
<HeaderStyle BackColor="#5D7B9D" Font-Bold="True" ForeColor="White" />
<PagerStyle BackColor="#284775" ForeColor="White" HorizontalAlign="Center" />
<RowStyle BackColor="#F7F6F3" ForeColor="#333333" />
<SelectedRowStyle BackColor="#E2DED6" Font-Bold="True" ForeColor="#333333" />
<SortedAscendingCellStyle BackColor="#E9E7E2" />
<SortedAscendingHeaderStyle BackColor="#506C8C" />
<SortedDescendingCellStyle BackColor="#FFFDF8" />
<SortedDescendingHeaderStyle BackColor="#6F8DAE" />
</asp:GridView>
</td>
</tr>
</table>
</fieldset>
</div>
Note: I have used two images edit.png and delete.png in this example to show in gridview fro editing and deleting operation and placed that in Images folder. You can search on google for similar images and add a folder in root directory of your project and name it Images. add the images in this folder.
- In the code file (default.aspx.cs) write the code as:
First include the following namespaces:
using System.Data;
using System.Data.SqlClient;
using System.Configuration;
using ServiceReference1;
then write the code as:
ServiceReference1.Service1Client obj = new ServiceReference1.Service1Client();
protected void Page_Load(object sender, EventArgs e)
{
if (!Page.IsPostBack)
{
BindRegRecordsInGrid();
}
}
private void BindRegRecordsInGrid()
{
DataSet ds = new DataSet();
ds = obj.GetUserRegDetails();
grdWcfTest.DataSource = ds;
grdWcfTest.DataBind();
}
protected void btnSubmit_Click(object sender, EventArgs e)
{
if (btnSubmit.Text == "Update")
{
UpdateRegDetails();
}
else
{
SaveRegDetails();
}
}
private void UpdateRegDetails()
{
RegDetails regDet = new RegDetails();
regDet.UserRegId = Convert.ToInt32(ViewState["UserRegId"].ToString());
regDet.FirstName = txtFirstName.Text.Trim();
regDet.LastName = txtLastName.Text.Trim();
regDet.EmailId = txtEmail.Text.Trim();
regDet.Password = txtPwd.Text.Trim();
regDet.ContactNo = txtContact.Text.Trim();
obj.UpdateUserRegDetails(regDet);
lblStatus.Text = obj.UpdateUserRegDetails(regDet);
ClearControls();
BindRegRecordsInGrid();
}
private void ClearControls()
{
txtFirstName.Text = string.Empty;
txtLastName.Text = string.Empty;
txtEmail.Text = string.Empty;
txtPwd.Text = string.Empty;
txtContact.Text = string.Empty;
btnSubmit.Text = "Submit";
txtFirstName.Focus();
}
private void SaveRegDetails()
{
RegDetails regDet = new RegDetails();
regDet.FirstName = txtFirstName.Text.Trim();
regDet.LastName = txtLastName.Text.Trim();
regDet.EmailId = txtEmail.Text.Trim();
regDet.Password = txtPwd.Text.Trim();
regDet.ContactNo = txtContact.Text.Trim();
lblStatus.Text = obj.InsertUserRegDetails(regDet);
ClearControls();
BindRegRecordsInGrid();
}
protected void imgEdit_Command(object sender, System.Web.UI.WebControls.CommandEventArgs e)
{
RegDetails regDet = new RegDetails();
regDet.UserRegId = int.Parse(e.CommandArgument.ToString());
ViewState["UserRegId"] = regDet.UserRegId;
DataSet ds = new DataSet();
ds = obj.FetchUpdatedRecords(regDet);
if (ds.Tables[0].Rows.Count > 0)
{
txtFirstName.Text = ds.Tables[0].Rows[0]["FirstName"].ToString();
txtLastName.Text = ds.Tables[0].Rows[0]["LastName"].ToString();
txtEmail.Text = ds.Tables[0].Rows[0]["EmailId"].ToString();
txtPwd.Text = ds.Tables[0].Rows[0]["Password"].ToString();
txtContact.Text = ds.Tables[0].Rows[0]["ContactNo"].ToString();
btnSubmit.Text = "Update";
}
}
protected void imgDel_Command(object sender, System.Web.UI.WebControls.CommandEventArgs e)
{
RegDetails regDet = new RegDetails();
regDet.UserRegId = int.Parse(e.CommandArgument.ToString());
if (obj.DeleteUserRegDetails(regDet) == true)
{
lblStatus.Text = "Record deleted Successfully";
}
else
{
lblStatus.Text = "Record couldn't be deleted";
}
BindRegRecordsInGrid();
}
protected void btnCancel_Click(object sender, EventArgs e)
{
ClearControls();
lblStatus.Text = string.Empty;
}
protected void txtPwd_PreRender(object sender, EventArgs e)
{
txtPwd.Attributes.Add("value",txtPwd.Text);
}
- Notice that in the web.config file the address, binding and contract is automatically added in the Consuming application.
Now run the Consuming application and enjoy with your wcf application. But make sure the wcf service we created earlier is also running.