Overview of REST
REST stands for Representational State Transfer. This is a protocol for exchanging data over a distributed environment. The main idea behind REST is that we should treat our distributed services as a resource and we should be able to use simple HTTP protocols to perform various operations on that resource.
When we talk about the Database as a resource we usually talk in terms of CRUD operations. i.e. Create, Retrieve, Update and Delete. Now the philosophy of REST is that for a remote resource all these operations should be possible and they should be possible using simple HTTP protocols.
Now the basic CRUD operations are mapped to the HTTP protocols in the following manner:
- GET: This maps to the
R(Retrieve) part of the CRUD operation. This will be used to retrieve the required data (representation of data) from the remote resource.
- POST: This maps to the
U(Update) part of the CRUD operation. This protocol will update the current representation of the data on the remote server.
- PUT: This maps to the
C(Create) part of the CRUD operation. This will create a new entry for the current data that is being sent to the server.
- DELETE: This maps to the
D(Delete) part of the CRUD operation. This will delete the specified data from the remote server.
so if we take an hypothetical example of a remote resource that contain a database of list of books. The list of books can be retrieved using a URL like:
www.testwebsite.com/books
To retrieve any specific book, lets say we have some ID that we can used to retrieve the book, the possible URL might look like:
www.testwebsite.com/books/1
Since these are GET requests, data can only be retrieved from the server. To perform other operations, if we use the similar URI structure with PUT, POST or DELETE operation, we should be able to create, update and delete the resource form the server. We will see how this can be done in implementation part.
Note: A lot more complicated queries can be performed using these URL structures. we will not be discussing the complete set of query operations that can be performed using various URL patterns.
Using the code
Now we can create a simple WCF service that will implement all the basic CRUD operations on some database. But to make this WCF service REST compatible we need to make some changes in the configuration, service behaviors and contracts. Let us see what WCF service we will be creating and then we will see how we can make useful over the REST protocol.
creating REST enabled ServiceContract
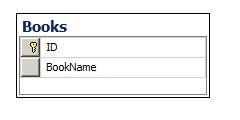
We will create Books table and will try to perform CRUD operations on this table.
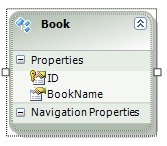
To perform the Database operations within the service lets use Entity framework. This can very well be done by using ADO.NET calls or some other ORM but I chose entity framework. (please refer this to know about entity framework: An Introduction to Entity Framework for Absolute Beginners[^]). The generated Entity will look like following.
Now the service contract will contain functions for CRUD operations. Let us create the ServiceContract for this service:
Hide Copy Code
[ServiceContract]
public interface IBookService
{
    [OperationContract]
    List<Book> GetBooksList();

    [OperationContract]
    Book GetBookById(string id);

    [OperationContract]
    void AddBook(string name);

    [OperationContract]
    void UpdateBook(string id, string name);

    [OperationContract]
    void DeleteBook(string id);
}
Right now this is a very simple service contract, to indicate that individual operations can be called using REST protocol, we need to decorate the operations with additional attributes. The operations that are to be called on HTTP GET protocol, we need to decorate them with the WebGet attribute. The operations that will be called by protocols, like POST, PUT, DELETE will be decorated with WebInvoke attribute.
Understanding UriTemplate
Now before adding these attributes to these operations let us first understand the concept of UriTemplate.UriTemplate is a property of WebGet and WebInvoke attribute which will help us to map the parameter names coming from the HTTP protocol with the parameter names of ServiceContract. For example, if someone uses the following URI:
localhost/testservice/GetBookById/2
We need to map this first parameter with the id variable of the function. this can be done using theUriTemplate. Also, we can change the function name specifically for the URI and the name of URI function name will be mapped to the actual function name i.e. if we need to call the same URL as:
localhost/testservice/Book/2
then we can do that by specifying the UriTemplate for the operation as:
Hide Copy Code
[OperationContract]
[WebGet(UriTemplate  = "Book/{id}")]
Book GetBookById(string id);
Following the same lines, let us define the UriTemplate for other methods too.
Hide Copy Code
[ServiceContract]
public interface IBookService
{
    [OperationContract]
    [WebGet]
    List<Book> GetBooksList();

    [OperationContract]
    [WebGet(UriTemplate  = "Book/{id}")]
    Book GetBookById(string id);

    [OperationContract]
    [WebInvoke(Method = "GET",UriTemplate = "AddBook/{name}")]
    void AddBook(string name);

    [OperationContract]
    [WebInvoke(Method = "GET",UriTemplate = "UpdateBook/{id}/{name}")]
    void UpdateBook(string id, string name);

    [OperationContract]
    [WebInvoke(Method = "GET",UriTemplate = "DeleteBook/{id}")]
    void DeleteBook(string id);
}
Implementing the Service
Now the service implementation part will use the entity framework generated context and entities to perform all the respective operations.
Hide Shrink  Copy Code
public class BookService : IBookService
{
    public List<Book> GetBooksList()
    {
        using (SampleDbEntities entities = new SampleDbEntities())
        {
            return entities.Books.ToList();
        }
    }

    public Book GetBookById(string id)
    {
        try
        {
            int bookId = Convert.ToInt32(id);

            using (SampleDbEntities entities = new SampleDbEntities())
            {
                return entities.Books.SingleOrDefault(book => book.ID == bookId);
            }
        }
        catch
        {
            throw new FaultException("Something went wrong");
        }
    }

    public void AddBook(string name)
    {
        using (SampleDbEntities entities = new SampleDbEntities())
        {
            Book book = new Book { BookName = name };
            entities.Books.AddObject(book);
            entities.SaveChanges();
        }
    }

    public void UpdateBook(string id, string name)
    {
        try
        {
            int bookId = Convert.ToInt32(id);

            using (SampleDbEntities entities = new SampleDbEntities())
            {
                Book book = entities.Books.SingleOrDefault(b => b.ID == bookId);
                book.BookName = name;
                entities.SaveChanges();
            }
        }
        catch
        {
            throw new FaultException("Something went wrong");
        }
    }

    public void DeleteBook(string id)
    {
        try
        {
            int bookId = Convert.ToInt32(id);

            using (SampleDbEntities entities = new SampleDbEntities())
            {
                Book book = entities.Books.SingleOrDefault(b => b.ID == bookId);
                entities.Books.DeleteObject(book);
                entities.SaveChanges();
            }
        }
        catch
        {
            throw new FaultException("Something went wrong");
        }
    }
}
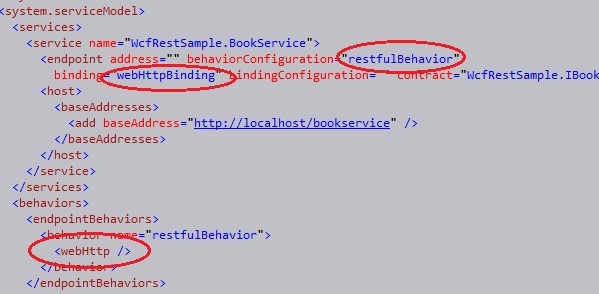
Restful WCF service Configuration
Now from the ServiceContract perspective the service is ready to serve the REST request but to access this service over rest we need to do some changes in the service behavior and binding too.
To make the service available over REST protocol the binding that needs to be used is the webHttpBinding. Also, we need to set the endpoint's behavior configuration and define the webHttp parameter in theendpointBehavior. So our resulting configuration will look something like:
Test the service
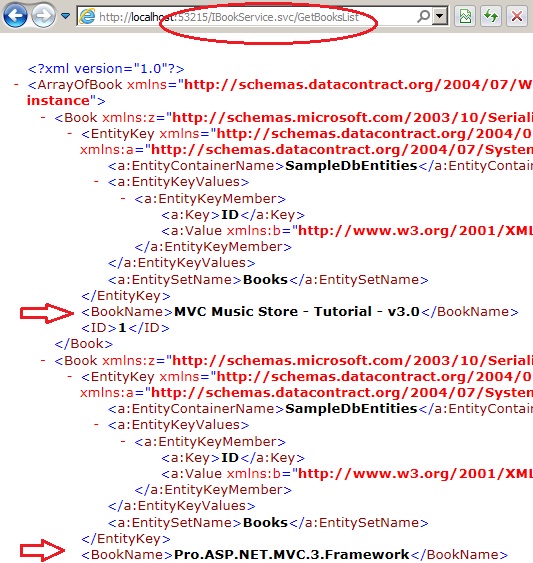
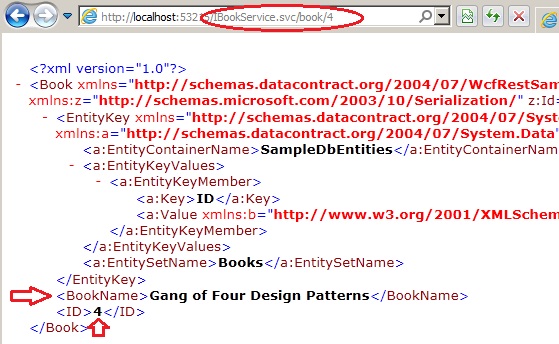
Now to test the service we will simply run the service and use the URLs to retrieve the data. let see this for ourGET operations in action.
And now testing the query to get a single record
And so we have seen that we received the response in the browser itself in form of XML. We can use this service without even consuming it by adding a service reference by using the URLs and HTTP protocols.
Note: Here I am not demonstrating the other operations for POST, PUT and DELETE but they are fairly straight forwards and a simple HTML page sending the data using the required protocol with the specified parameter names will perform the operation.
Using JSON
We can also change the Response and Request format to use JSON instead of XML. To do this we need to specify properties of the WebInvoke attribute.
RequestFormat: By default its value is WebMessageFormat.XML. to change it to JSON format, it needs to be set to WebMessageFormat.Json.ResponseFormat: By default its value is WebMessageFormat.XML. to change it to JSON format, it needs to be set to WebMessageFormat.Json.
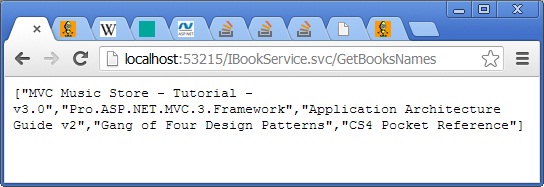
Let us create one more operation in our service contract called as GetBooksNames and will apply theResponseFormat as Json for this method.
Hide Copy Code
[OperationContract]
[WebGet(ResponseFormat=WebMessageFormat.Json]
List<string> GetBooksNames();
The response will now appear in the JSON format.
And now we have a WCF REST service ready with us.